### looking for my birth mom!!!###
Everything you never wanted to know about correcting an incorrectly installed in ground trampoline. Boing!
We inherited an in-ground trampoline when we bought our house earlier this year and its been a great activity for our kids. And the grown-ups too. And that brings us to our project today. This grown-up caused about 4 springs to rip off into the air at about mach 5. NORAD now tracks them in orbit.
Needless to say we ordered a new trampoline mat and springs to replace the ruined ones from www.funspot.com (let me know if you buy from these guys). Highly recommended if you need replacement parts and I think the least expensive place on the web. Something you will find out about this SAH dad is that I am frugal, or as my wife translates “cheap”.
After receiving the new mat and springs we went to install them only to realize the frame had torqued and was 4″ too wide in one direction across than the other. The reason? The original homeowners did not install a retaining wall in the trampoline pit and therefore over 4.5 years the sides slowly collapsed in on the frame bending it out of shape. Lucky us, we had a surprise Home Depot project. Yea!
Because I am so “frugal”, we decided on the following method for a retaining wall. Its cheaper and less permanent if you ever want to lose the tramp and fill the hole in or convert it to a hot tub. Here is how we did this thing:
First we dug the hole out wider and took the old frame out. Once out, it pretty much self-adjusted back into shape.

We fit the frame back in the hole to make sure it was round and everything was going to fit up. Note the white spray paint where we marked the location for the 4×4 posts. The hole had to be widened by 4″ all the way around to accommodate the posts that were going in.
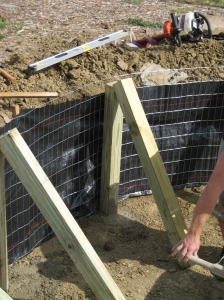
Next we rented an auger from Home Depot with an 8″ bit and dug 12 holes for 12 48″ pressure treated 4×4’s to be cemented in to hold back the retaining wall. This wall would be built of 36″ high welded wire fence wrapped on the outside with 36″ silt fence wrapped outside of that. See below.

my sweet wife pulling a string to make sure the posts across from each other are level

The 4×4’s laying on an angle are just for support till the concrete cures.
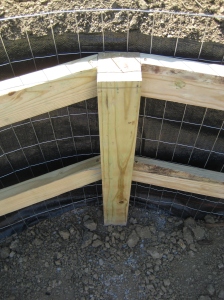
After the 4×4’s cured, I cut two 2×4 horizontal supports to fit between each post. Use a radial miter saw to cut the angles as it saves a lot of time.

Next I bent the remaining top 4 or so inches of welded wire fence over the top and tacked both sides at the top with fence staples. I then wrapped the loose silt fence over that and stapled it in place.


Last, back fill the trench between the wall and the dirt. Stomp it down and you’ll notice the wire bulge out some. Acceptable give in my opinion.

We smoothed out the bottom and lined it with the remaining silt fence sans attached sticks.

Colorado is a very dry climate – the evaporation rate is higher than the precipitation rate so I didn’t worry too much about drainage other than grading the top away from the hole.
Next drop that frame in the hole, assemble, add springs, mat and voila!

Lets see how cheap I really am!
Silt fence $30
Welded wire fence $35
12 PT 2x4x8’s $36
6 PT 4x4x8’s $48
box of screws $5
box if fence staples $3
auger rental $46
6 bags quickcrete $27
Total Project Cost $230.00
I am happy to respond if you have any questions. Have fun!
Chuck Norris installs in-ground trampolines with a roundhouse kick to the kit to assemble it then he stares it down..literally, he stares at it till is sinks into the ground with fear. It usually only takes about 3 seconds.
You must be logged in to post a comment.